

How To 3d Print Design
VDorchester is an online writer with interests in technology and music.

Phone case printed for the author based on 3D model created in Blender.
How to Make 3D Models in Blender
To complete this tutorial, you will need:
- Blender
- Blender 3D Printing Toolbox
- Some skill in Blender
Blender is an open-source program that you can use to make your own models. If you do not know how to use Blender at all, there are plenty of sites where you can learn.
For this tutorial, I used Blender 2.67, which comes with the 3D Printing Toolbox. To make sure the toolbox is enabled in Blender, go to File, open up the User Preferences, click Add-ons, search for "3D Print Toolbox", and click the little check box to enable it.
This tutorial is currently for models that are only one color.
Setting up the dimensions in Blender.
Setting up the Dimensions
When we are done, we will upload our model to a website called Shapeways. Shapeways is a 3D printing service that prints your 3D models and ships them to you. However, they charge by the volume of the model in cubic centimeters, so we need to make sure that our models are down to scale. You wouldn't want to try to print a model that's 2 x 2 x 2 meters because that would cost a lot of money, and may not even be possible on most printers. Shapeways also charges by material, so a model printed in solid silver will be a lot more expensive than a model printed in plastic.
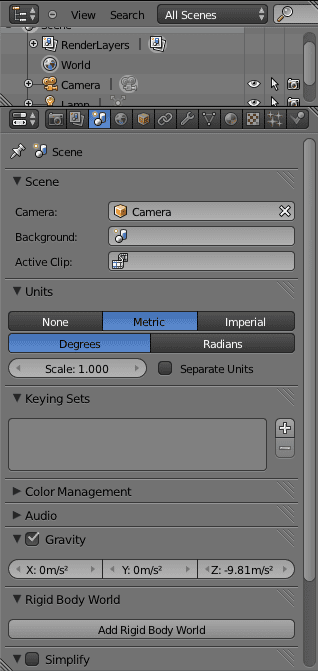
In order to set your dimensions, open up your scene, go to the scene tab, and change the units to Metric. This will change the measurements so that they are in metric (meters and centimeters) rather than the standard blender unit. We will use metric because Shapeways operates in metric, and metric units are easier to notate in blender than imperial units.

Scaling Down
Once your scene is in metric units, make sure the object is selected and press "N" to open up the toolbar on the right. Under dimensions, scale down the object to however small you want. I used 5 x 5 x 5 cm (actually type "5cm" in the box and it will recognize the cm, or use decimals since it's in meters by default. .01 meters = 1cm). However, you might notice that when you zoom in the object starts to disappear. This is because the camera can not currently see objects as small as we just made ours. To fix this, scroll down in the toolbar to where it says "Clip" (under the 'View' tab), and set the start to a very small number; I usually do 1cm. Now, you will see models until you get 1cm away from their surface in blender.
Tip: save a file like this to use as a default file for 3D printing models, that way you don't have to reset these settings every time. You can just open up your default file, then click save as and rename it without having to redo all of your settings whenever you want to model on a smaller scale for printing.
Poll:
Checking the Volume
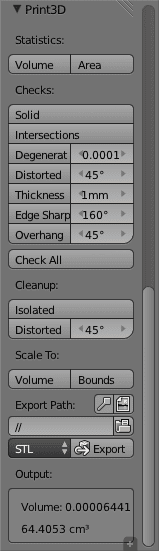
Now that your model is scaled down, let's check its volume. Select the model in Object Mode, then press "T" to make sure the toolbar on the left is open. After hitting "T", scroll down to the bottom of that toolbar until you see the Print3D tab. This is the 3D Print Toolbox. You can click "Volume" and scroll down, and it will show you the volume of your model. Right now it's pretty high and that would be quite expensive, so let's fix that by making the model hollow.
Tip: you can actually scale the model automatically so that it is exactly a certain volume. To do this, under the Print3D tab, find Scale To and click volume. Then, type in your desired volume in cm, and it will automatically scale your model for you. Use the notation "125cm3" for 125 cubic centimeters.

Make sure you use centimeters, not meters.
Giving the Model Thickness
This step is where you have to be a little precise. Printers can only print things down to certain dimensions. For example, the printers at Shapeways require their plastic models to have walls at least .7mm thick. To check the requirements of your desired material, go to the materials page, click your material, then click "Design Guideline" at the bottom. This will show you all of the requirements for your design.
Now, in order to add thickness, select your object, then add a Solidify modifier. This will make the model solid by adding an extra wall. Set the thickness to your desired measurement, making sure it is at least as thick as the required wall thickness for your material, then click apply.
Tip: In order to make accurate measurements in blender, press N to open up the toolbar, then with your model selected, press tab to go into edit mode. Once there, find "Mesh Display" in the toolbar, then under "Edge Info" click the checkbox for length. This will show you the length of all of your selected edges.
Adding an 'Escape Hole'
One trick modelers use to make the volume of their model much smaller is making their models hollow. You can do this by adding a tiny hole in the model called an "escape hole" (again, check your material requirements to see the required size for the hole). This allows extra material to fall out of the escape hole and hallows out the model as a result. Make sure you apply the solidify modifier first.
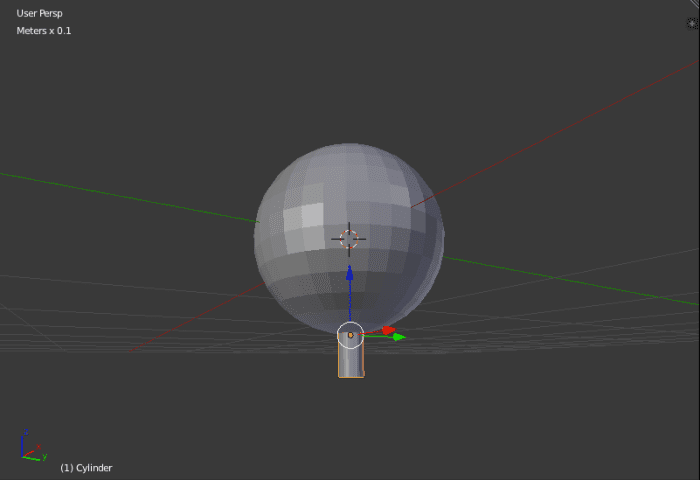
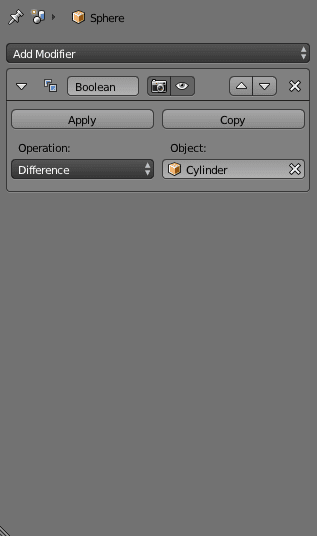
To make the escape hole, add in a separate cylinder mesh and scale it down to the size of the hole you want on your model. Then, move the cylinder so that it intersects your model at the spot where you actually want the hole to be. Add a Boolean Modifier to your original model now and set the operation to difference and the object to the cylinder. When you're ready, click apply and delete the cylinder to see your new escape hole.
Exporting Your Model
Now, if you check the model's volume with the 3D Print Toolbox (you have to re-click volume), it should be much lower. Double check your measurements to make sure everything is at your desired scale, and then above the export button, designate a file path and click export. You should now have a .stl file at your designated location.
Uploading Your Model to Shapeways
Finally, go to the Shapeways website and go to their Make + Sell page. Upload your file, and then complete the process, making sure to use meters as the unit of measurement. They will send you a confirmation email saying your model was submitted. They will then automatically check the dimensions, and send another email confirming whether or not they are able to print your model. If your model is denied, they will include a very brief description of why in the email. Just fix up your model and resubmit it. When it is accepted, you will be able to find it, after a brief wait, under the 'My Models' tab. You can then add it to your cart, select your material, and they will print your model and ship it directly to you.
Things to note:
- Shapeways may ask you to make an account. They are a trustworthy company that I've had an account with for awhile so you can do this without having to worry.
- Your model will be uploaded under your account, so it will be a private model that only you can access unless you choose to sell it.
- Yes, you can sell your models on Shapeways. Read more on their website about opening a shop and selling your models.
- When you upload your models, you still own all of the rights to it, including the right to take your model down from their site whenever you please.
- I am not affiliated with Shapeways in any way besides being one of their customers.
- Some printers are more specific about what they can and can't do than others. For example, some printers have different overhang limitations, or they work differently for models with intersecting meshes. With Shapeways, I have yet to run in to any of these problems, but just be sure to check the material requirements as a precaution.
Happy printing!
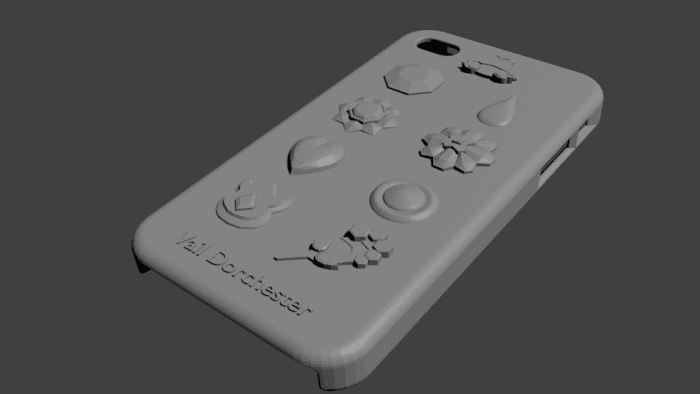
A render of a phone case.
Poll
This article is accurate and true to the best of the author's knowledge. Content is for informational or entertainment purposes only and does not substitute for personal counsel or professional advice in business, financial, legal, or technical matters.
© 2013 VDorchester
Brandenfascher on April 16, 2014:
@Petrino B, I had the same problem until I discovered that I had to select the object first. It was only then that the Transform section appeared with the dimensions scaling.
CereusGraphics on March 02, 2014:
A great article written with great hard work...i must say....a great work of your which shows...I like your site its quite informative and i would like to come here again as i get some time from my studies. And I will share it with my friends.
How To 3d Print Design
Source: https://turbofuture.com/graphic-design-video/How-To-Make-Models-For-3D-Printing
Posted by: gregoryleighte47.blogspot.com
0 Response to "How To 3d Print Design"
Post a Comment